Create Python development environment in Docker - a step by step guide for Windows
You know what really grinds my gears (Family Guy pun intended)?!
When I’m working on multiple open-source projects, and suddenly an update causes some of them to stop functioning.
Have you ever experienced any of these symptoms after a software or package update:
- functions start returning previously unknown warnings or errors
- some programs yield different results with the same data
- your old projects stop working entirely
There is a distinct feeling, when you procrastinate on a project for a long time, then one day, bored to death, you watch a ton of motivational YouTube videos & finally decide to go back to it. You execute the code, which months ago was working fine, and then, bam! Error. My own ‘research’ (sample size: just me) suggests this increases the likelihood of abandoning the project by 47.63%.
If this happened to you, and it’s rather a question of when and not if, I feel for you. But there’s no need to worry. A combination of Visual Studio Code and Docker Desktop might be just the perfect solution for you.
Hop on! It will take some time to explain!
Any comments, remarks, questions - feel free to contact me at tomasz@demystifAI.blog

Image thanks to courtesy of DALL·E 3
A little bit of history (you can skip this)
I consider myself a recovering lazy person. Throughout my life I have been living in a spiral of periods of excessive activity (sports, reading or partying) mixed with periods of numbness (playing games whole day, watching series all day, watching that one last video of cat riding through a rainbow at the end of the Internet). That changed when I introduced 2 elements to my daily routine: structure and planned small achievements. But that’s a story for another time.
One of artifacts that I have from such periods of numbness is that I have never finished my master’s thesis (thankfully I have my bachelor’s degree at least). Actually twice I came close. In 2015 when I was first finishing my master’s courses I became eligible to write a masters thesis. But I didn’t do anything except thinking of a title. Then I moved overseas (3.5 years in England, 0.5 years in Indonesia) and didn’t think about it a lot, but unfinished business hanged around my neck like an albatross. I came back to my country (Poland) in 2019 and around 2020 I decided that I will take master’s courses again. And so I did - I switched to a slightly different type of degree within Economics department, had to pass around 15 different exams, and in 2022 ended up in the same scenario that I had in 2015. I had to write my master’s thesis. Obviously it would be just too simple if I would write it immediately then. So I started to work on it just in 2023. Small steps - every day for 30 min (again, story for another time).
Until October everything was going fine - I got 30 pages written in LaTeX. You probably picked up already that I like to make things more difficult than they should be (or I like ambitious tasks. Or both. It depends.). At the end of October I enrolled to a very labour-intensive AI Development course - which completely devoured 5 weeks of my time (but highly recommended! You can find it here, though it’s in Polish - AI Devs. During the course to utilize Python OpenAI package properly I updated my Python version from 3.9 to 3.12. When I finished the course and returned in glory - I decided to resume working on my thesis.
Then it happened. The horror. The code that I was writing for the empirical analysis part of my thesis stopped working. Not only that - the main package for portfolio optimization PyPortfolioOpt, which is substantial to empirical part of my thesis, is at the moment not compatible with Python 3.12. What the hell!?!? Why this cruel & ungodly punishment is being brought upon me? For couple of days I tried to restore everything to the same place (fortunately I have requirements.txt file with versions of packages used in the project. Good practice, highly recommend generating ones in your programming projects), but it was just too much work and I was too frustrated.
I like to think that I am very unique, so there shouldn’t be more than 100 million people exactly like me in the world. And because I am so unique, probably thousands (if not more) of people over the world have similar software version dependency problems. There is actually a huge software company (or two - if we consider Microsoft’s Visual Studio Code as the second one. Microsoft rings a bell, right?) that address this issue. Suspense music. Here comes Docker.
While there are alternatives to Docker and Visual Studio Code, I’ll focus on these for simplicity (and conformity - as I use those).

Another product of DALL·E 3
Docker Desktop and Dev Containers to the rescue: a solution for Windows users
I could explain what is Docker and what is Visual Studio Code, but it’s better if you read it on their respective websites (links below).
So, let’s work on what steps we need to take to make the magic happen.
I. Install necessary software
Download & install those bad-boys:
II. Create a folder for your container
Let’s violate all of the terms of Geneva Conventions and for the sake of this post directly create your folder on your C: drive.
C:\AwesomeFolder\KickAssContainer
III. Create Dockerfile
Dockerfile is needed (at least to my current knowledge) to create your container. It contains instructions telling Docker Desktop “how” your container should look like.
Warning: Ensure the filename is ‘Dockerfile’ (no extension, case-sensitive). You can create it using Notepad, Visual Studio Code, or Notepad++.
My example of Dockerfile contents:
# Base image - for python environments mostly Python
FROM python:3.9-slim

# set the working directory
WORKDIR /code

# install dependencies
COPY ./requirements.txt ./

RUN pip install PyPortfolioOpt  && \
    pip install --no-cache-dir --upgrade -r requirements.txt

# copy the src to the folder
COPY ./src ./src
What’s happening here? Let’s explain step by step:
| Command | Explanation |
|---|---|
| FROM python:3.9-slim | install Python Image. List of python images available here: python images |
| WORKDIR /code | folder name on your container with files that you will want to execute on that container |
| COPY /.requirements.txt ./ | this command will copy requirements.txt file (containing version of all your Python libraries to install on the container) to your WORKDIR |
| RUN pip install PyPortfolioOpt && \ pip install –no-cache-dir –upgrade -r requirements.txt | brief explanation: install all packages directly named & from requirements.txt file more details: this is a tricky one. Using “" and && allows Docker to execute multiple commands in the environment one after another. For package installation we use pip, which is a Python package installer (pypi webpage). Firstly, PIP will install specific package PyPortfolioOpt (huge shoutout to Robert Martin, who is the main developer of this package. You can check the package documentation here: PyPortfolioOpt and Robert’s website here: Reasonable deviations. Why do we need to call it like that? Because unlike most other packages that we have in our requirements file this package have different alias (PyPortfolioOpt) in pip and different while calling/installing the package to your Python instance (pypfopt). And if that’s the case for some reason you have to do this workaround to install the package properly. If you find this not precise enough and have more knowledge, please drop me a message and I will happily learn more ;). Secondly, you want to install all packages from requirements file, where options no-cache-dir prevents pip from storing additional installation files and source files on your container (you want to keep Docker image as small as possible). The “-r” command points out that next string will be pointing out to a requirements file (requirements.txt in our case). |
| COPY ./src ./src | Copy the “src” folder to our container. Having all your project codes & files in “src” project is a common practice. |
IV. Create docker-compose.yml
You can read about what is YAML here: YAML Wikipedia. YAML is basically a human-readable data serialization language, often used for configuration files like docker-compose.yml.
You can create the docker-compose.yml file using VS Code, Notepad++, etc. Remember, it’s case sensitive and should be saved with the .yml extension:
services:
    dev_env:
        build: .
        container_name: docker-python
        command: sleep infinity
        volumes:
            - .:/code
What are we telling Docker to do here?
| Command | Explanation |
|---|---|
| services: | list of services that we want Docker to run on our container |
| dev_env: | user-defined name of the service. ‘dev_env’ is chosen here to indicate a development environment. Note the indentation, which signifies that ‘dev_env’ is a part of ‘services’. |
| build: . | the dot indicates the presence of a Dockerfile in the same directory as the docker-compose.yml. This Dockerfile is used to build our container. |
| container_name: docker-python | user-defined name of container. Should be unique and meaningful |
| command: sleep infinity | brief explanation: keeps your container “up” until you take it down more details: command specifically used (but not always) for debugging and dev environments. Good containers are small in size and carry out only a set of specialized instructions. After those instructions are done - container closes with exit code 0 (“container exited normally” - there are no more instructions to execute). Our case is different - we want to have a live Python development environment, where we can play around for unspecified amount of time. To achieve that - we ask container to “sleep” indefinitely. That way it will be in use until we specifically command the container to shut down. Warning: While this command is useful in our case it might cause trouble in a lot of different cases. Containers execute commands in order - that means that if you build a multi-service container and you ask it to wait indefinitely before executing some other instructions (like calling a database service) - it might never finish. Be mindful of that. |
| volumes: .:/code | maps the current directory (.) on your host machine to the ‘/code’ directory in the container, creating a shared volume. Any changes made in the ‘/code’ directory inside the container are reflected in the ‘C:\AwesomeFolder\KickAssContainer’ (as specified in section III. Create Dockerfile) directory on the host machine. |
V. Requirements file
The requirements.txt file contains all the packages and their versions to be installed in your container environment, crucial for managing dependencies. Specifying incorrect versions can lead to development issues & artificial brain explosions.
If you do not know how to create requirement.txt file, you can look it up in those places (I use session-info package):
In my project requirements.txt file looks as below
matplotlib==3.6.3
mplfinance==0.12.9b7
numpy==1.24.1
pandas==1.5.3
scipy==1.10.0
session_info==1.0.0
IPython==8.8.0
jupyter_client==7.4.9
jupyter_core==4.11.1
jupyterlab==3.4.4
notebook==6.4.12
You might notice that I don’t have PyPortfolioOpt specified here. That’s because I directly ask pip to install this package in III. Create Dockerfile section.
What you can see in the file is that we specify strong equality - which means that pip will install exactly those specified versions of packages. You can specify greater or equal versions using “>=” or compatible versions using “~=” (to be honest, never tried this one). Strong equality is a great tool for maintaining package compatibility.
The packages listed from matplotlib to session_info are additional dependencies. The ones from IPython through notebook are specific to Jupyter Notebook. Those are optional (and specific to usage of Jupyter Notebooks).
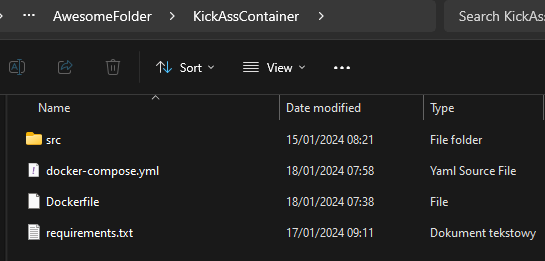
So overall our KickAssContainer folder contents looks like this:
VI. Start your container
Yet another program to start and adventure to survive! Now that we have our container setup configured in Docker files, we can start our container. In order to do that we will have to open Windows PowerShell (preferably with administrator privileges - so run as Administrator).
Now we will execute couple of commands.
Warning: Docker Desktop must be running for these commands to work. If it’s not visible after opening, check the system tray’s hidden icons.
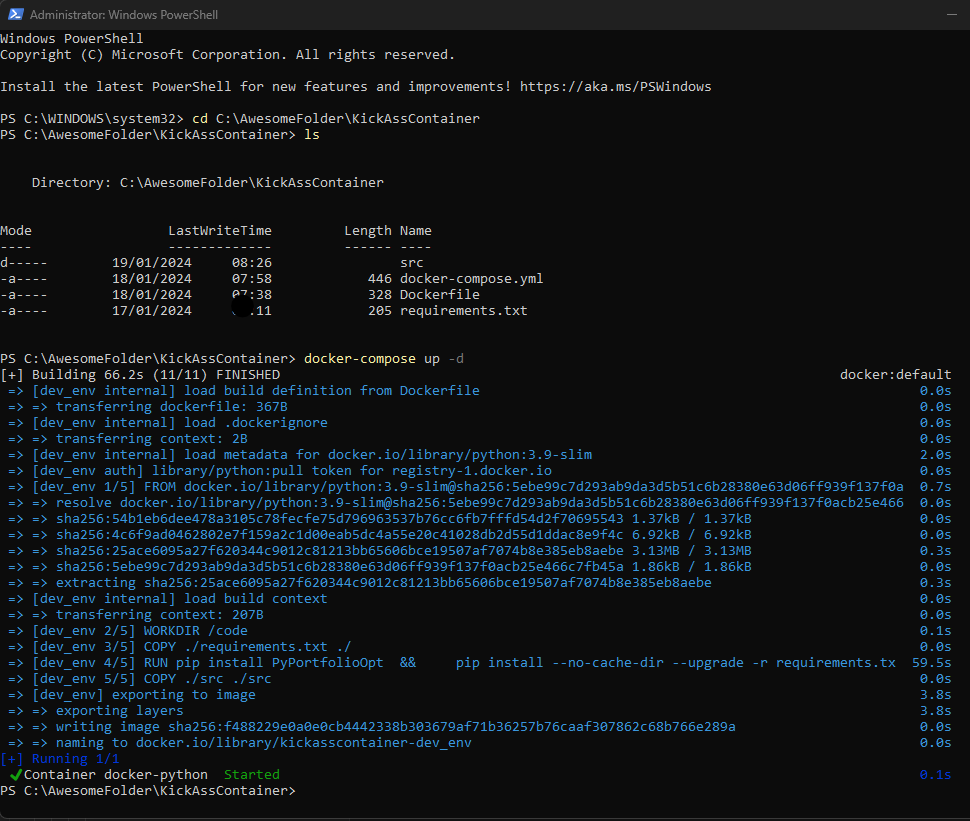
cd C:\AwesomeFolder\KickAssContainer
ls
docker-compose up -d
Below screen bears fruits of our commands:
What happened?
| Command | Explanation |
|---|---|
| cd C:\AwesomeFolder\KickAssContainer | cd is short for “change directory”. Changed directory to our containers directory |
| ls | short for list. Listed files in the directory to make sure that you are in the right directory. Spoiler alert: you are. |
| docker-compose up -d | creating our container from docker-compose.yml file. This provides a substantial log (at least for the first time) covering all steps necessary to launch specified container. Option -d stands for detached - post executing container composing it will allow you to execute other commands in PowerShell. Without this option Container would block PowerShell and you would not be able to do anything until you specifically shut the container down using ctrl + c shortcut. |
We can see from the image that container build lasted 66,2 seconds on my laptop, most of which was packages installation & pip upgrade. This is probably the place, where more advanced Docker users can make the container lighter and faster.
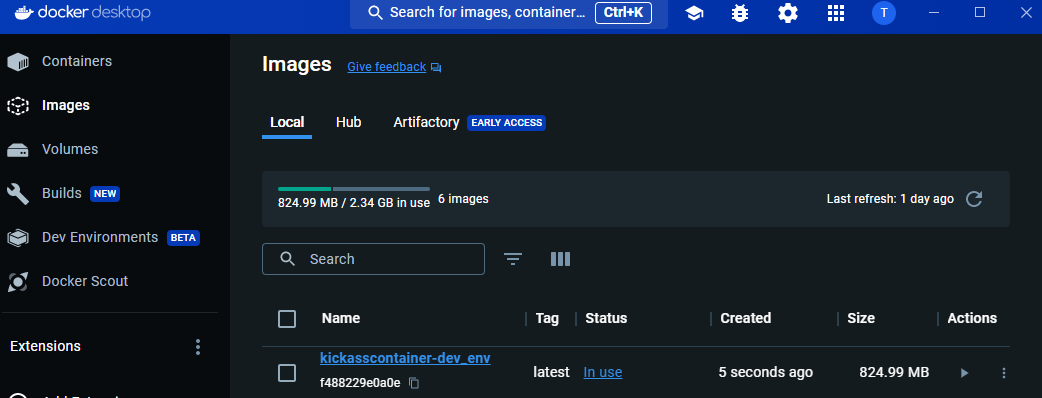
Is there any proof of container up and running? Yes there is, please find this screen from Docker Desktop:
Now that we have our container we can start learning how to use it.
VII. Develop code in Visual Studio Code
You are getting close to coding in on your development environment now.
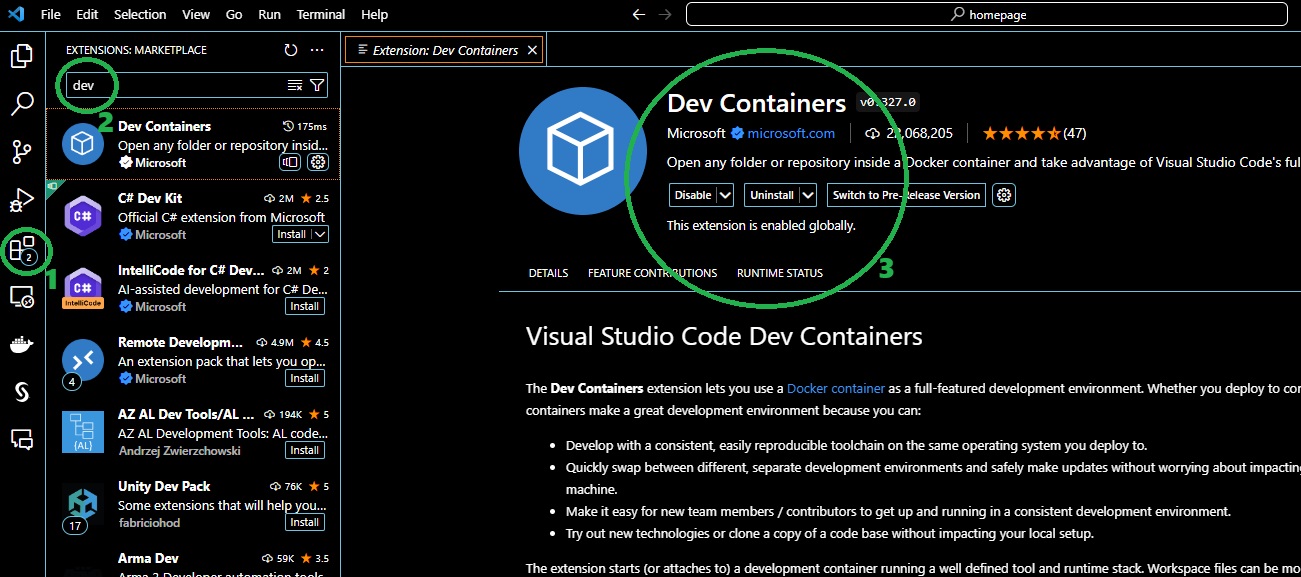
First, we need to open Visual Studio Code (my screenshots will be dark, because my soul is dark) and install some extensions.
So:
- Go to “extensions” panel
- Type whatever extension you need in search box
- Install (on my screen button says “uninstall”, because I have this extension already installed)
Necessary extensions to be installed that way: Docker & Dev Containers.
List of extensions that I am using currently:
- autopep8 - formatting support for Python (easier to make your code look tidy)
- Dev Containers - support containers on local machine
- Docker - support for Docker
- Github Copilot - paid AI code-along assistant (huge boost to coding productivity)
- Jupyter - for jupyter notebook support (interactive programming)
- Pylance - language support for Python (basically hints and descriptions)
- Python - my programming language
It time to switch to the virtual machine:
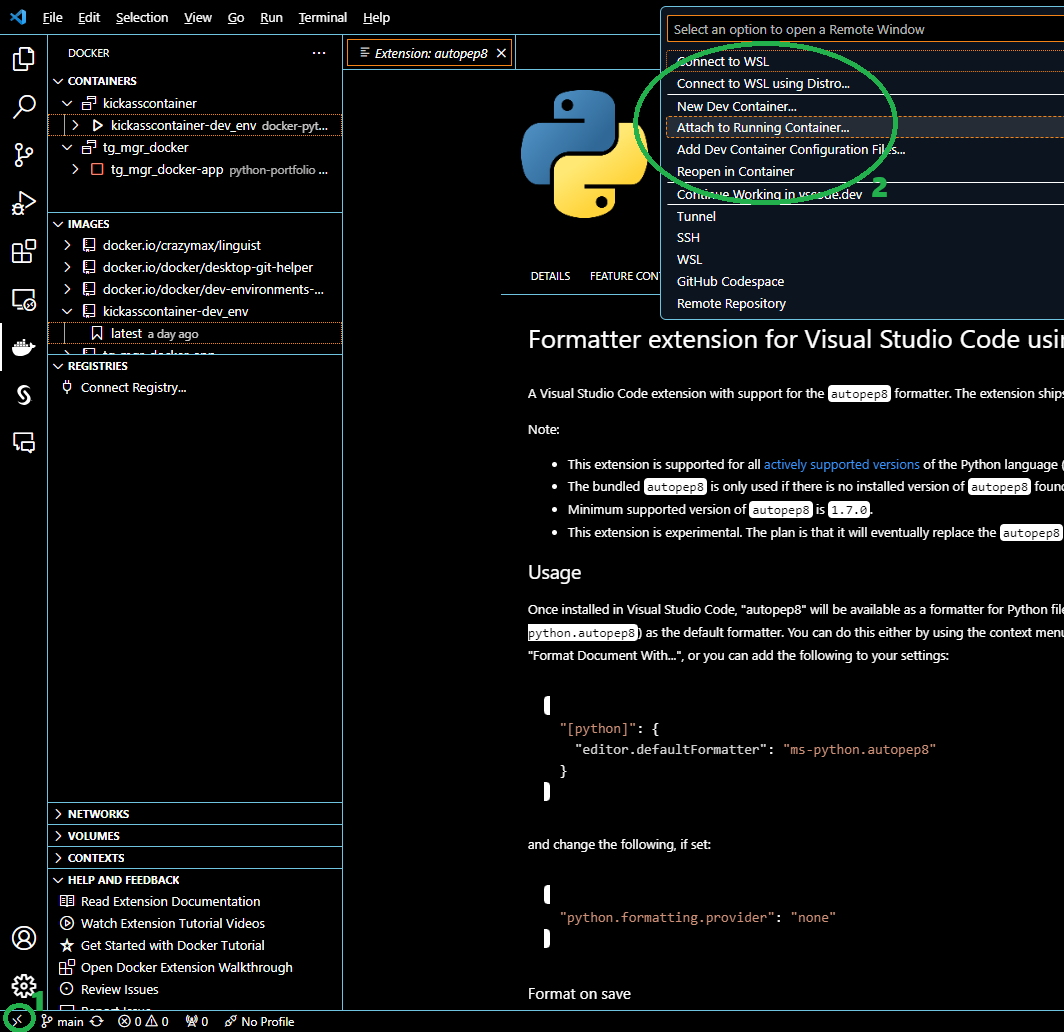
- On the bottom left side of your VS Code interface click on “><” icon saying “Open a Remote Window”
- You will see a list in command panel. Select “Attach to running container”
- Select “docker-python” container
- A wild VS Code window should appear (Pokemon GameBoy game reference for older players ;) )
If you did everything correctly you should see something like this on the bottom left side of the interface.

Ok, Neo, you’re in (again references for old people)!
Now it’s time to make some noise.
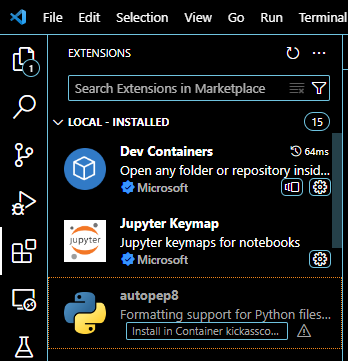
You’ll need to install extensions on your VS Code Container in order to interpret Python correctly. While to my best knowledge (at least so far), this is manual, you need to do it only once.
You do it by going to the “Extensions” tab and confirming installation with “Install in container (…)” button per required extension (at least Jupyter and Python).
Now go to “File” -> “New File” (or shortcut: ctrl + alt + win key + n) and create a new jupyter notebook.

Now you can test if your Python environment is working. You need to make sure that you have a Python kernel enabled to the compiling.

I will execute some simple code:
import numpy as np
import pandas as pd
import pypfopt

print("Hello World")
print(2+5)
print('Wow this actually worked! You actually can trust strangers on the internet ;)....... I think')
The results are in:
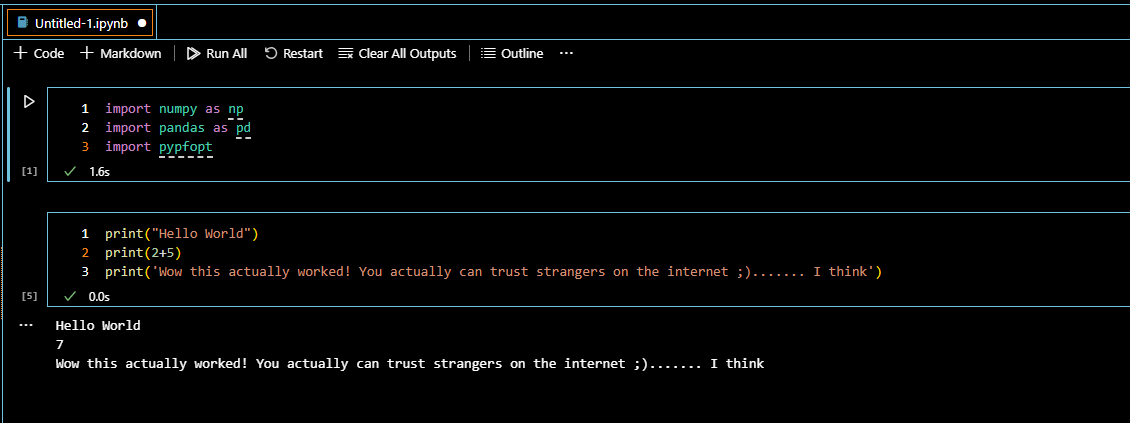
It’s working! It’s working!

DALL·E 3 strikes again
VIII. Saving your work and closing container
Now we can save our work.
If you go to “File” -> “Save File” (or just use shortcut: ctrl + S) you will see root folder of your container. But not only. Your beautiful work directory “code” is also there, hidden in plain sight.
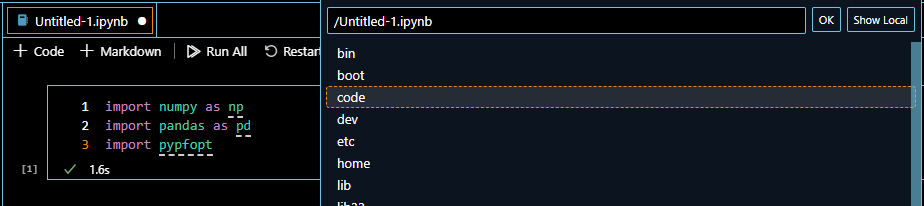
Now you are in your volume folder “code” - which is a shared folder between your PC and container. Whatever you save here, stays safe on your hard drive, even if container is closed / removed.
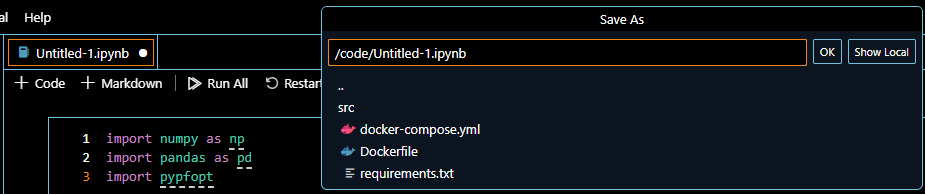
To learn proper file management techniques and to keep your file structure tidy save your notebook in “src” folder (standard file convention for folder name with source files for a project). I propose file name as something along the lines “001_testContainer.ipynb”.
Done!
Now you can close you Visual Studio Code and move to PowerShell console window.
Commands that you want to execute are (and you have to be in your C:\AwesomeFolder\KickAssContainer folder to execute them properly. If you moved, navigate again with cd command):
docker ps
docker-compose down
docker ps
You will see something like that in the console.

Commands go as follow:
| Command | Explanation |
|---|---|
| docker ps | checks if there are any containers up & running. We can see that docker-python is up & well |
| docker-compose down | takes the container down |
| docker ps | checks if there are any containers up again. Returned list is null, so we closed the container succesfully |
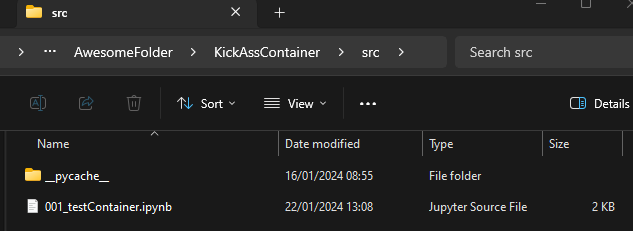
Now you can close PowerShell and DockerDesktop. One thing remaining is to check contents of C:\AwesomeFolder\KickAssContainer\src . Let’s take a peek:
Your work is done! Congratulations!
IX. Conclusion
Now you are ready to work in your own development environment.
Let’s recap the key benefits of this setup:
- You are managing your containers separately, that means that you can work on separate projects using different versions of same software / packages (isolation)
- You don’t need to worry about updates new versions that are compatible with your current build (easy dependency management)
- You can easily share your projects on github or other tools along with requirements.txt file and docker files for other users to easily re-create your results (reproducibility)
- More advanced docker users can make their Docker containers extra light to perform only necessary tasks (efficient resource utilization)
Having that in mind, have a look at 1 more useful PowerShell commands for Docker:
docker-compose up --build -d
Whenever you update your Docker files (container setup) or requirements file it will be useful to rebuild the container. That’s what’s this command is for.
Now you are ready to sail through the container sea. I wish you luck!

Aye, Aye, captain! Image of course by DALL·E 3
P.S. : If you have any questions, comments - please feel free to drop me an e-mail to tomasz@demystifAI.blog
P.S. 2: I would like to extend my gratitude to Patrick Loeber, who recorded a video with similar tutorial for Docker on YouTube. This was a huge inspiration (and starting point) for my material. You can find the video here.
P.S. 3: You can find Github with necessary files used for this tutorial on my Github. Be mindful that you will have to copy repository contents to “C:\AwesomeFolder\KickAssContainer” to make codes working.